This article has been co - authored by Dr. Bernie Villadieg0
Dr. Bernie B. Villadiego-
DDS, graduated from Creighton University School of Dentistry in 1989 and went
on to complete a general practice residency program at Los Angeles County/USC
Medical Center. He established a private practice with an emphasis in esthetic
and reconstructive dentistry in Chatsworth, California in 1993. An Accredited
member of the American Academy of Cosmetic Dentistry, Dr.Villadiego is a
graduate of several cosmetic residency dental programs at the Esthetic
Professionals Dental Education Center in California. He is also a visiting
faculty/clinical instructor with the Spear Education at Scottsdale Center for
Dentistry in Arizona. He has also completed a functional/occlusal residency program
at Texas Center for Occlusal Studies in Texas. An avid photographer, Dr.
Villadiego has lectured on the use clinical photography for diagnosing and
record keeping as well as the use of glamour photography in dental marketing

In part 1 of “THINK BEFORE YOUR
CLICKS” we addressed a few reasons like DISTORTION, NOISE, LACK OF RECORDING
ACCURATE COLORS/SHADE, LACK OF RECORDING IN RAW FORMAT etc. as to why mobile phone photography is considered as
substandard for dental documentation.This article in association with Dr.
Bernie shall put light on other problems related to mobile dental photography.
Apart from
high quality images a DSLR gives us a huge flexibility when it comes to
attaching a wide range of lenses and accessories like high end flash systems
and diffusers which have become an integral protocol to record high quality
dental images.
Many clinics
are now equipped with STUDIO LIGHTS (STROBES) which you might have seen in a
professional photo studio while making family portraits. Yes the ones with a
big black and white softbox attached to it. (Yes they are now being highly
recommended for dental photography!!) Every wondered why they keep 2 Studio lights
1 on either side at 45 degree? It is because this gives the best possible
natural effect to your skin tones and the light looks much more natural.
It is a good idea to remember one
golden rule:
When the light source is upfront the
images are always FLAT and loose dimension as well as a 3 D effect.
Examples of
such light sources are: In built flash of a DSLR, RING FLASH etc.
A good image
is not just a play of Light, but light and SHADOWS play a vital role in giving
the subject a third dimension. Without shadows the image is too flat to
appreciate depth.
Why this is
important in dentistry?
Well, even
in dentistry we want light and shadows and NOT LIGHT ALONE.
Line angles,
point angles and buccal convexities are supposed to have a good light
reflection whereas embrasures (especially gingival embrasures) are supposed to
have shadows in them so as to give a good 3 D effect to our images.
This is
where a TWIN LIGHT system comes into picture for dental professionals.
Be it Canon
(MT24EX) or Nikon (R1C1) Twin light is the IDEAL light source for dental
documentation because they are positioned laterally which give a more natural
and pleasant effect to our images. They illuminate the line angles sharply and
give subtle shadows in embrasures. Moreover they can be twisted and turned in 3
axes so that the light source can illuminate the area of concern accurately.
We can also
add diffusers/ soft boxes/ reflectors/ bouncers onto the flash to make the
light more soft so that we can even appreciate the surface textures and shades
better.
It is time
to ask can we do this in MOBILE PHONE PHOTOGRAPHY. Certainly not!
Mobile
phones give you NO SPACE to add accessories. Now a days we have seen macro lens
attachments for mobile phones which are nothing but a piece of poorly designed
glass and it just deteriorates the image quality even further.
INABILITY TO USE CUSTOM WHITE BALANCE SETTINGS for Shade Selection
It is
practically impossible to record the colors/ shades accurately if you do not
have custom white balance settings in your camera. Together with the help of a
NEUTRAL GREY CARD and custom white balance settings in a DSLR we can come
extremely close to the actual Hue, Value & Chroma of a tooth which is
impossible in a mobile phone.
Besides like
already discussed in PART 1 LED lights in a mobile phone aren’t color corrected
and hence they make the worst light to use for dental documentation.
They are too
feeble and hence ambient (available) light effects are easily recorded.
Available light like the chair light of your set up can badly affect your
images in mobile dental photography.
One may buy
extra LED panels but even they can be mounted and is to be hand heled or
mounted on light stands making the use very cumbersome.
DOCUMENTATION FOR PUBLICATION / ACCREDITATION?
Almost all
international journals and associations/ institutes are extremely careful about
privacy. They not only want to confirm that the documentation is your own but
they need all the METADATA (EXIF) data which now a days also has your GPS
coordinates that confirm the case / documentation has been done by yourself.
AACD uses raw images to prevent fraud in documentation
protocols and examination.
There is NO provision for recording a RAW
file in mobile phones.
RAW files are digital negatives and can
be opened by specific software’s only hence much more protected.
RAW files are lossless compressions of
the original image captured by the sensor. JPEG files on the other hand are
compressed to more than 5 times and hence do not have adequate details.
A DSLR when used can shoot both RAW+JPEG
files at one go. This is in fact the recommended setting for documenting our
dental cases.
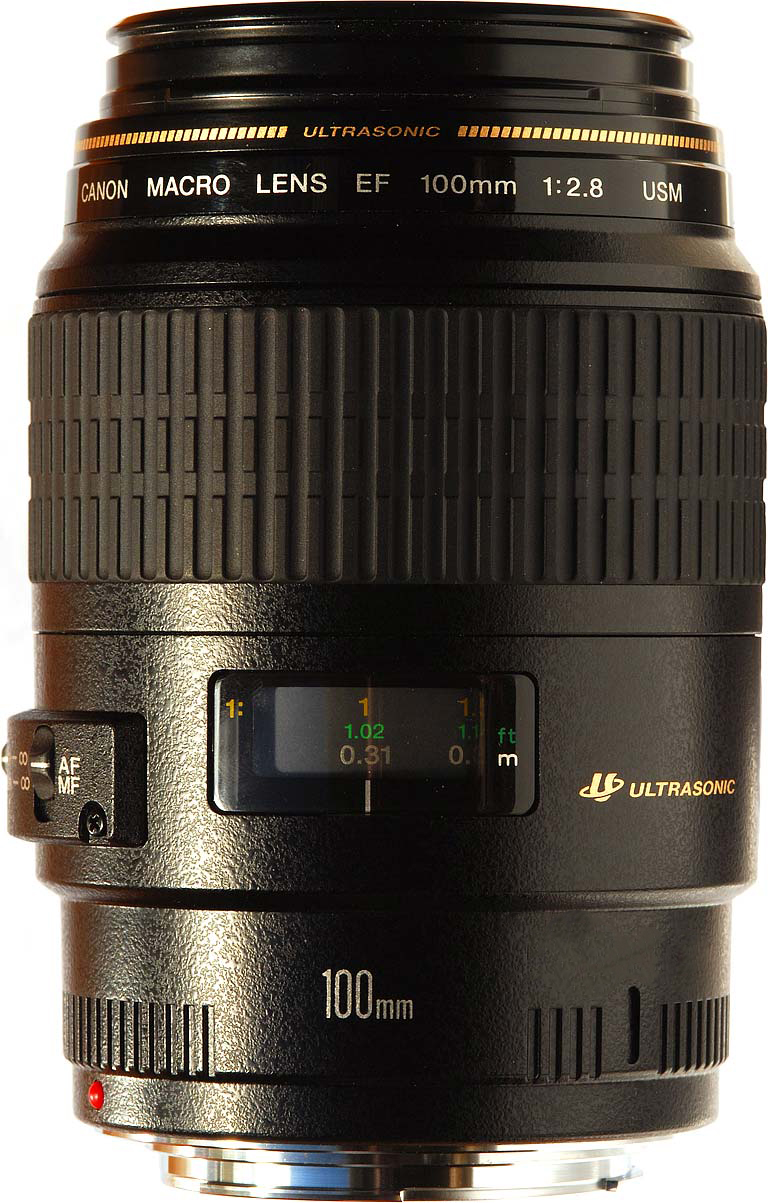
MAGNIFICATION RATIO
The BIGGEST drawback of using a mobile
phone for dental documentation is the lack of a STANDARD called magnification
ratio.
This function is ONLY available with MACRO lenses
where in you set the magnification first ( e.g. in anterior aesthetic cases as
per AACD guidelines we have to set a magnification of 1:1 or 1:2 first and then
record our pre and post-operative shots)
In the above image of a
100 mm macro lens MAGNIFICATION ratio is seen in YELLOW font and when the
focusing ring is rotated the magnification ratio changes. One can set the
desired magnification first and then shoot. This gives greater standardization
with respect to image composition which is impossible using a
mobile phone. When one standardizes the magnification ratio he also standardizes
the distance from which the image has to be taken.
This increases the chances of pre and
post-operative images looking same.
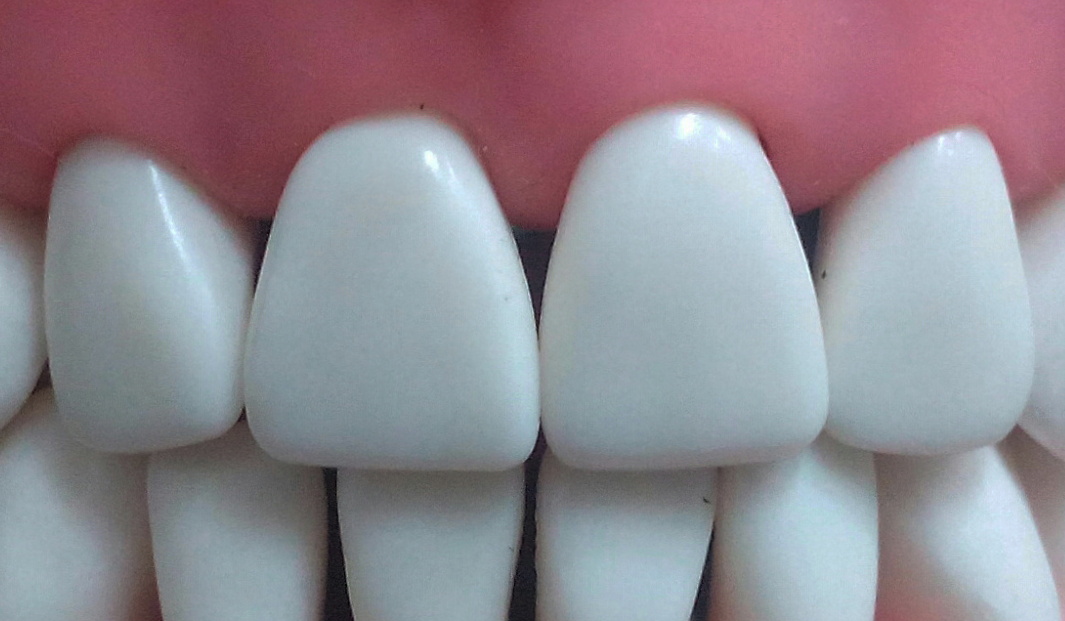
An example of standardization of
composition using a single magnification ration of 1:1A picture collage makes it easier for the
viewer to relate to the case and summarize the entire protocol. Watermarking
with your name is a must to prevent theft of images and prevent copyright issues.
CONCLUSION
It is not a
good choice to use mobile phone documentation in dentistry for all the reasons
discussed in the article THINK BEFORE YOUR CLICKS.
It might
have limited use to communicate a surgical procedure to your patients/
colleagues, short margin of crown to your lab etc. but it is to be kept at an
informal level among peers only.
There is NO
COMPARISON of a DSLR and a mobile phone for documentation.
Aesthetic
dentistry has NO ROLE of mobile phones in documentation.
A valid
advice would be “Use your phones for communication not documentation.”


